How to Conceal Under-Eye Circles and Brighten Your Look (Part 2)
About this time of year, many of us begin to feel that our skin looks dull. Brightening up the area around the eyes is the best way to look refreshed and vibrant in just a minute. We’ve had two weeks to try some of the remedies from my last blog post ‘How To Banish Those Dark Circles and look more awake’
I always use Micellar Water to clean eye makeup away and never rub my eyes hard! I also drink a lot of water to stay hydrated (luckily, it’s also my favourite drink), and I frequently use cold compresses on my eyes when I use my weekly face masks. I, however, am one of the unlucky women that still has those pesky dark circles, no matter what I do, and this is where I now turn to my training and my makeup kit/makeup bag.
Additional Tip:
Before I give you my favourite products and application methods, one tip which I always use, especially on clients is: using an eyelash curler. This may seem like it has noting to do with concealing your dark circles, however using an eyelash curler takes care of two issues: It gets rid of the shadow your lashes cast on your under-eye area, and opens your eyes, making you look more awake. Win-Win and worth a minute being added onto your daily routine.
3 Step Process for Covering your Dark Circles
So now to the actual covering of the dark circles. This is an easy 3 step process which takes no time at all once you’ve mastered the application.
Step 1: Correct
Dark circles tend to be blue or grey in colour. To correct them you need to apply a colour that’s opposite on the colour wheel, which would be peach or orange. If you have fair skin, choose a light to medium peach colour. For medium to dark skin, pick a dark peach or orange colour. For very dark skin use an orange red.
When choosing a corrector go for a shade that is 1-2 shades darker than your skin colour. It’s important to pick a darker shade, so it hides your dark circles. Apply the corrector in an upside-down triangle with your ring finger or rounded concealer brush, low enough under the eyes to completely cover the area. Don’t forget to correct the inner part of your eye near your tear duct too. Don’t worry about your under eyes looking orange, as the next step is to conceal.
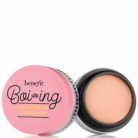
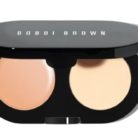
There are 3 products within my makeup kit/makeup bag which I love to use for correcting dark circles:
Step 2: Conceal and Blend
If you don’t wear foundation, choose a concealer that’s the same colour as your skin tone and place it on top of the orange concealer you just applied.
Blend it out with the warmth of your ring finger and watch the peach/orange colour disappear.For those of you who wear foundation, dot your foundation all over your face and buff it into your skin as usual. Be gentle around your eye area so that you don’t remove the orange concealer that’s underneath.
The goal in this step is to blend the corrector and foundation into one.If you feel like you can still see your corrector, you may want to brighten your under eyes with a lighter concealer. All you need is a thin consistency concealer like Yves Saint Laurent Touché Éclat or MAC Pro Longwear Concealer. Choose a colour that is one shade lighter than your skin tone, so it brightens the under-eye area. Place a couple dots under your eye and blend it out with a soft dome brush.
My current favourite go to products for concealing are:
Step 3: Set your Makeup
Using the same soft dome brush, apply a thin layer of setting powder under your eyes to set the concealer and prevent it from creasing throughout the day. If you like using face powder, use a flat thin sponge and apply a thin layer of powder in your T Zone and under your eyes. My preferred powder right now is Charlotte Tilbury’s Airbrush Flawless Finish Powder, because it’s super smooth and doesn’t cake up!
I hope this helps with your daily battle with dark circles! I realize this is a process, but I swear by this method when I, or a client, needs some heavy-duty coverage. With time it will only take a couple of minutes and make you look and feel more awake.
Application Tips
-
The skin isn’t smooth like a piece of plastic, so to get full coverage apply your concealer with a concealer brush using criss-cross motions. This gets the concealer into the fine lines on the skin that aren’t normally visible.
-
Then, to make your concealer completely disappear, feather the edges with your ring finger. The warmth from your finger will melt the concealer into your skin.
-
A little goes a very long way. I am amazed at how little I have to use! If it is creasing, it was too much. Just pat at the concealer with your ring finger to smooth it out and use a little less next time. Experiment (it’s only makeup!) till you find the right amount for you.
-
If you have a few extra fine lines around the eyes, (happy lines) start by gently stretching the skin flat then applying just a little bit of corrector/concealer down/away from your tear duct working outwards. With the remainder of your product on the brush lightly sweep over the area with the lines and pat gently with your ring finger to blend. Release your taught skin and voila, no makeup collecting in your lines.
-
The inner corner of the eye, on the side of the bridge of the nose is a GREAT place to add light. It wakes up your eyes and brightens your whole face.
If you have any other useful tips that I can add to this post, please post a comment or comment on this post on my Facebook page. All additions will be credited.
Follow this blog for more tips on makeup, hair and beauty, info and tutorials. If you have any ideas on what you want me to write about or give step by step tutorials on, please email me at [email protected]
Don’t forget to check out my website – http://www.makeup-byclaire.co.uk.
Claire xx
Follow / Share


